The usage of backlit house numbers in contemporary domestic lighting design is growing in popularity. These illuminated address numbers enable homeowners plainly display their address while improving the front façade's attractiveness by fusing ornamental outside illumination with useful visibility. Backlit numbers include built-in LED illumination that creates a gentle halo effect behind each digit, eliminating the need for porch lights or adjacent street lighting.
In addition to serving as a minor architectural lighting element on the outer wall, its soft glow enhances nighttime visibility for guests, deliveries, and emergency services. Although installing backlit numbers might initially appear difficult, it is actually quite simple if done step-by-step. Homeowners may safely install these illuminated numbers and add a contemporary external lighting element that enhances curb appeal and usefulness with the right preparation, equipment, and wiring.
What Are Backlit House Numbers
Address numbers with built-in LED lighting that illuminates behind each digit are known as backlit house numbers. The LEDs produce a gentle halo glow when mounted on an external wall, highlighting the address and subtly enhancing the façade of the house with ornamental lighting.
Backlit numerals produce their own illumination, in contrast to conventional numbers that rely on outside lighting sources. The LED lighting covers the entire wall and is positioned beneath the number housing. This effect gives the external design depth and enhances visibility at night.
To withstand outside circumstances, the majority of backlit numbers are constructed from weather-resistant materials like aluminum or stainless steel. These lit numbers add to a unified residential lighting design when paired with other outdoor lighting components like porch lights or pathway lights.
How Backlit House Numbers Differ from Standard House Numbers
Simple numerals that are affixed straight to a wall or door are known as standard home numbers. They are only visible when there are light sources nearby, such as streetlights or porch lights. These figures may be hard to notice in dimly lit areas, particularly if shadows are cast on the wall.
Because backlit numbers include built-in LED illumination underneath the digits, they function differently. The numbers are outlined by a halo effect created by the light spreading outward toward the wall. Even in situations when there is little outside lighting, this glow makes the address apparent.
The mounting design is another distinction. Spacers or mounting plates that hold the numerals significantly away from the wall are used to place backlit numbers. The LED light can disperse uniformly thanks to this gap, which also gives modern architectural lighting its floating look.
Backlit House Numbers as Exterior Lighting
House numbers with backlights serve as more than just address indicators. They also serve as a subdued kind of outdoor lighting that draws attention to a home's entryway. The LED light stretches outward and gives the facade depth because it shines toward the wall surface.
A lot of homeowners include illuminated house numbers in the overall lighting scheme of their homes. To achieve a well-balanced lighting design surrounding the entry, they can be placed next to wall sconces, porch lights, or pathway lighting.
This method enables the numbers to fulfill two functions simultaneously. They enhance address visibility and add to the property's attractive lighting. Backlit numbers are a useful and aesthetically pleasing lighting element since the halo lighting effect is gentle enough to blend in with current outdoor fixtures without overpowering them.
Why Install Backlit House Numbers
Homeowners decide to install illuminated house numbers for several reasons. Improved address visibility at night is the most evident advantage. Having the numbers plainly illuminated makes it easy for delivery drivers, visitors, and emergency personnel to find the right house. By adding contemporary architectural illumination to the exterior wall, backlit numbers also improve curb appeal. LED lighting's halo effect gives off a crisp, elegant look that goes well with modern interior design.
Reliability is an additional benefit. LED lighting is incredibly low-maintenance and consistently bright. The lighting system's energy efficiency allows it to run for extended periods of time without consuming a lot more electricity. Backlit house numbers can be installed correctly to create a long-lasting lighting element that enhances the outside style and usefulness of the property.
The Impact of Illuminated House Numbers on Exterior Design
A significant factor in determining how a house looks after dusk is the exterior lighting. This design is enhanced by illuminated house numbers, which give the wall surface depth and delicate lighting. A gentle glow is produced as the light from the LEDs behind the numbers disperses uniformly over the background material. The numbers appear to float slightly away from the wall due to the halo effect. The façade gains depth from the contrast between the lit borders and the surrounding area. When combined with additional lighting components like entry lights or walkway lighting, backlit numbers look very good. When combined, these fixtures produce a tiered lighting system that enhances visibility and draws attention to the home's architectural characteristics.
Before You Begin: Planning the Installation
Carefully planning the installation guarantees a tidy and expert final product. First, pick a spot where the numbers will be easy to see from the roadway. Typical installation locations include a gate column, the garage façade, or close to the front entry. Next, use a level and measuring tape to make sure the numerals are aligned and spaced correctly. Because even minor positioning mistakes might become apparent once the illumination is turned on, proper alignment is crucial.
Additionally, make sure there is a sufficiently low-voltage power source close by. The numerals need a compatible transformer or driver because they are LED-lit. Lastly, examine the wall's composition to see if anchors are required for a stable installation.
Tools and Materials Needed for Installation
The hardware that comes with the number package and a few standard home tools are needed to install backlit house numbers. Once drilling and mounting get underway, delays can be avoided by preparing these items before the process begins. The majority of kits include wire connectors, screws, spacers, and threaded mounting studs. In order for the halo lighting effect to disperse uniformly behind each digit, these elements enable the numerals to be positioned slightly away from the wall. Additionally, basic tools are needed to connect the wire, drill mounting holes, and measure alignment. Prior to starting the installation, having these tools available guarantees a seamless operation and lowers the possibility of mistakes being made when positioning or securing the numbers.
Materials Included with Backlit House Numbers
Usually, backlit house number kits come with several parts that make installation easier. Typically, the package includes pre-attached cabling for the LED lighting as well as the lighted numbers themselves. To assist in marking the drilling positions on the wall, a paper installation template is provided. The numerals can be firmly fastened to the mounting plate using threaded studs and mounting screws. To regulate the distance between the numbers and the wall, spacers of varying sizes are supplied. In order to safely attach the electrical cables, wire connectors are also included. Certain kits come with decorative caps that hide the visible screw heads and give the installation a more polished look.
Tools Required for Installation
To effectively finish the installation process, a few basic tools are required. Making mounting holes in the wall or mounting plate requires a power drill with the appropriate drill bit size. While dimensions are being verified, masking tape can be used to secure the installation template to the wall. Drilling points are marked through the template using a pencil or marker. After the plate is in place, mounting screws can be secured with the use of a screwdriver. The numbers stay uniformly spaced and aligned thanks to measuring instruments like a level and a tape measure. To prepare the electrical connections for the LED lighting system, wire cutters and wire strippers could also be required.
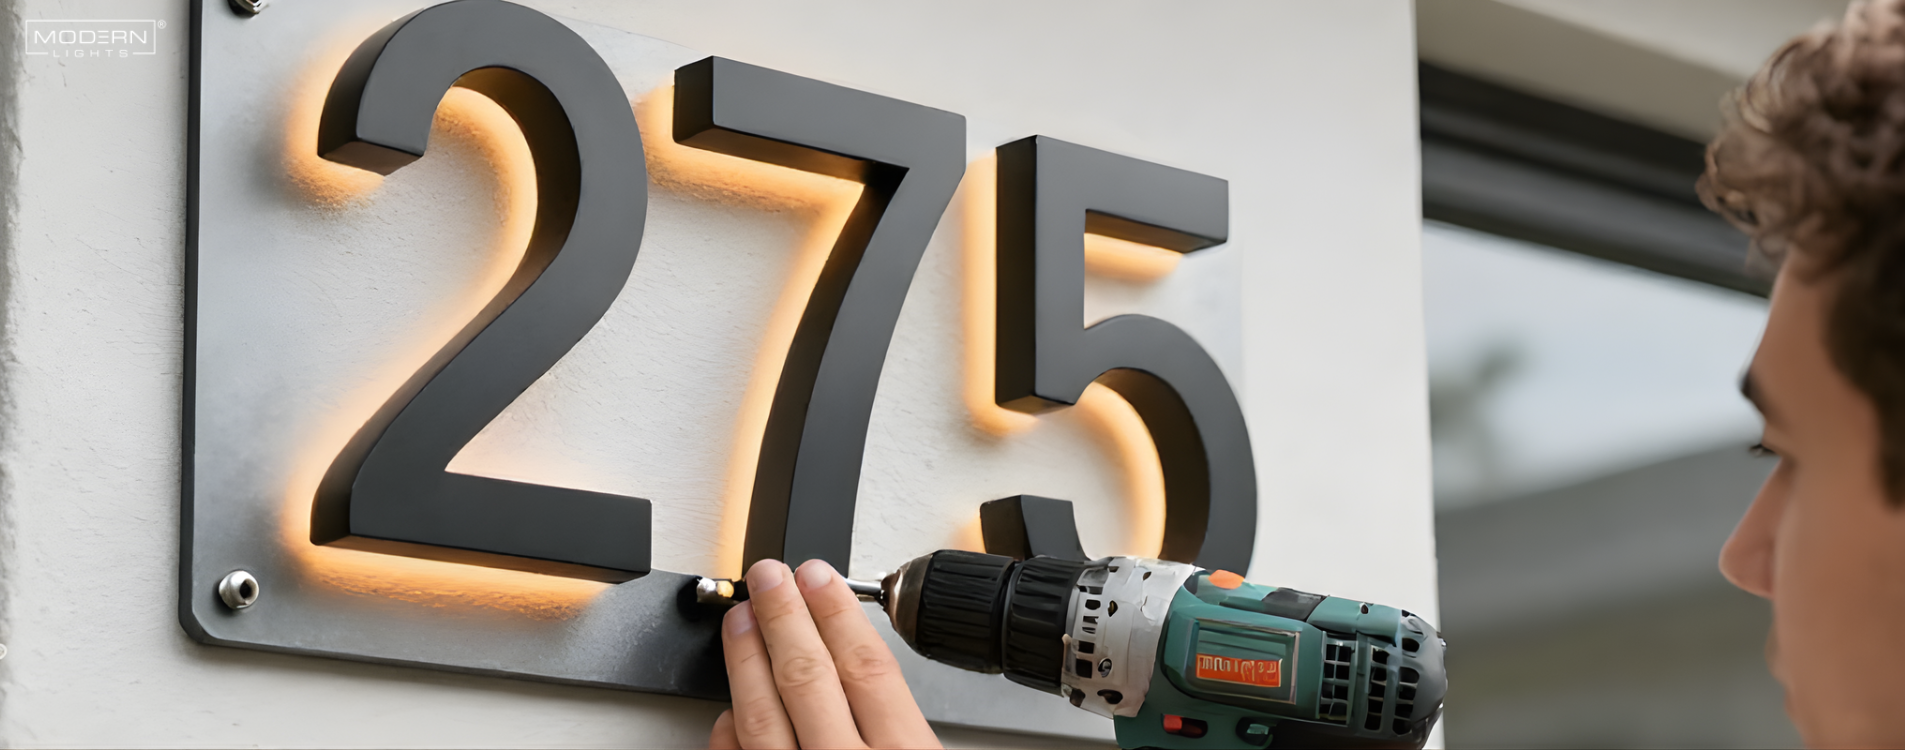
Step-by-Step Installation Guide for Backlit House Numbers

There are several processes involved in installing illuminated house numbers, including wall preparation, hardware mounting, and electrical wiring connection. When these procedures are followed correctly, alignment problems can be avoided, and proper operation of the lighting after installation is guaranteed. Examining the parts and getting the mounting area ready are the first steps in the procedure. The mounting hardware's hole locations are then marked using the drilling template. After that, the numbers are put together on the mounting plate and fastened to the wall.
The LED wire is linked to a low-voltage power source after the mounting gear is in place. A neat and uniformly lit address display is the result of a meticulously executed final installation.
Step 1 – Unbox and Inspect the Numbers
Remove the hardware and numbers from the box first. To preserve the finish, place the pieces on a soft surface, like a cloth. Verify that every part provided in the installation kit is there. Verify that the wire that connects the numbers to the LED housing is intact and firmly fastened. Verify that the screws, spacers, mounting studs, and wiring connectors are present. By checking these things before installation, you can avoid problems later and make sure everything runs properly once drilling starts.
Step 2 – Prepare the Mounting Surface
The mounting surface needs to be prepped and cleaned before any hardware is attached. The mounting plate may not be able to sit flush against the wall due to dirt, dust, or debris. Wipe the installation area with a cloth to get rid of any loose particles. Before installation, the wall surface should be fixed if it is uneven or flaking. When the numbers are installed, carefully preparing the wall helps avoid gaps between the plate and the surface and guarantees that the mounting gear will hold firmly.
Step 3 – Position the Paper Template
The alignment procedure is made easier by the paper template that comes with the installation package. Make sure the template is level before attaching it to the wall with masking tape. To make sure the arrangement appears balanced from a distance, take a step away from the wall. Before marking the drilling locations, make any necessary adjustments to the position. Uneven numbers after installation can be avoided by making sure the template is properly aligned at this point.
Step 4 – Mark the Drill Holes
After the template is properly positioned, mark the drilling spots through the template openings with a pencil or marker. After removing the template, press firmly enough that the markings are still visible. After marking every spot, take the template down from the wall. Verify the markings a second time to make sure they line up uniformly and correspond with the number spacing.
Utilizing the Mounting Plate to Install Backlit Numbers
A mounting plate that conceals the wiring and retains the numbers is a common feature of illuminated number systems. Before the entire device is affixed to the wall, this plate enables the numbers to be assembled. Additionally, the mounting plate offers stability and aids in preserving uniform digit spacing. Screws can be used to affix the plate to the wall after the numbers are fastened to it. Because the electrical connections are concealed behind the plate, this method streamlines wiring and contributes to a neater final look.
Step 5 – Drill Holes in the Mounting Plate
Using the template's specifications, position the mounting plate on a sturdy surface and drill the necessary holes. The threaded studs or mounting screws from the rear of the numbers can go through the plate thanks to these holes. To ensure that the numbers lie evenly once connected, make sure the holes are drilled neatly and precisely.
Step 6 – Install Screws and Light Spacers
Slide the spacers onto the mounting screws after inserting them through the plate apertures. The distance between the numbers and the wall depends on the size of the spacer. Smaller spacing generates a tighter lighting effect, whereas larger spacers produce a wider halo glow. Select the size of the spacer that best fits the intended lighting look.
Step 7 – Attach Numbers to the Mounting Plate
Before fastening the numbers, insert the electrical wires through the plate opening. Gently tighten the screws until they are securely fastened after aligning the threaded studs with the plate holes. Don't tighten the hardware too much. Before attaching the plate to the wall, make sure the numbers are level and equally spaced.
Wiring the Backlit House Numbers
A 12-volt DC power source is needed to run the LED lighting system on backlit numbers. Two wires in each number need to be linked to the primary power source. To guarantee correct polarity during installation, these wires are color-coded. Correct wire connections avoid electrical problems and provide uniform LED illumination.
Step 8 – Connect Grey Wires to the Positive Terminal
The positive electrical connection is represented by the grey cables. The ends of the wires should have about half an inch of insulation removed. Together with the power supply's positive wire, twist the grey wires from each number. To guarantee that the wires stay firmly linked, secure the connection using a wire connector cap.
Step 9 – Connect White Wires to the Negative Terminal
The negative connection is represented by the white wires. Using the power supply's negative wire, screw the ends together after removing the insulation. To finish the electrical circuit, fasten the connection with a wire connector cap.
Power Needs for House Numbers That Are Backlit
Usually, backlit house numbers run on 12-volt DC power. A tiny amount of current, typically about 0.3 amps, is consumed by each number. The low voltage needed by the lighting system is converted from household electricity using an LED driver or transformer. Reliable functioning and constant brightness are ensured by selecting the appropriate transformer.
For outdoor installations, low-voltage LED solutions are safe and energy-efficient. They require little upkeep and can function for many years when installed correctly.
Conclusion
A useful technique to enhance outside lighting design and address visibility is using backlit LED house numbers. When properly installed, they offer unmistakable identification at night and subtly enhance the façade of the house with ornamental illumination.
By carefully following the installation instructions, homeowners may mount the numbers and guarantee dependable LED lighting. A successful installation depends on the right power supply, safe wiring, and proper alignment. Once installed, illuminated numbers boost curb appeal, facilitate visitor and delivery navigation, and blend in with the general home lighting design of the property.
Share:
How to Choose the Right Chandelier Size for Your Room?
How Address Plaques Increase Property Value and Curb Appeal?